
You know when you take that perfect photo, but it's too large to send by email or post online? Or when you need an image in a specific size for a website, but you don't want it to lose quality? Yeah, that happens to everyone. Luckily, nowadays you don't need to be an expert editor to solve this. There are several online tools that allow you to quickly reduce photo size online, and best of all, for free. Let's see how it works and what the best options are for you.
Key Takeaways
- It is possible to reduce the size of photos online for free using web-based tools.
- Resizing images doesn't necessarily mean losing quality; many tools preserve sharpness.
- Adjusting the size of photos is essential to optimize them for social media, websites, and even to save storage space.
- There are options to resize by percentage, exact pixels, or to use predefined sizes for specific platforms.
- Online tools offer fast compression and hassle-free download of optimized images.
Optimize Your Images Easily Online
You know when you have that perfect photo, but the file size is huge? Or when you need to adjust an image to fit perfectly in a social media post, but you don't want it to lose quality? Yeah, that happens to everyone. Luckily, nowadays, we don't need to be image editing experts to solve this. There are online tools that do all the hard work for us, and the best part: they're free and take only a few seconds.
Fast and Free Photo Compression
Losing space on your phone or computer with large photos is a pain, right? Image compression is the solution. Basically, it reduces the file size without you noticing a significant difference in visual quality. It's like giving a...
Resize Photos for Social Media and Web
Perfect Fit for Every Platform
Each social network has its own size requirements. Posting a photo with the wrong dimensions can cause it to be cropped awkwardly or lose quality. That's why knowing how to adjust your images is so important. Online tools make this easy, allowing you to choose the ideal format for each platform.
Optimization for Posts and Profiles
When you upload a photo to your profile or for a post, the platform usually resizes it automatically. However, starting with the right size ensures your image is sharp and clear, without distortion. This is especially true for cover photos or banners, which need to have a professional look. Proper resizing makes all the difference in a first impression.
Improve Your Visual Appearance Online
Resizing images for the web isn't just about fitting them into the right space. It's also about ensuring the image loads quickly without losing important details. A well-optimized image improves the user experience on websites and social media. Think about how a sharp, well-framed photo attracts more attention. For professional profiles, using a... professional image resizer This could be a great start.
Here are some common sizes to keep in mind:
- Facebook: Cover image (851×315 pixels), Profile picture (170×170 pixels), Post (1200×630 pixels).
- Instagram: Square post (1080×1080 pixels), Portrait post (1080×1350 pixels), Landscape post (1080×566 pixels), Stories (1080×1920 pixels).
- Twitter: Header image (1500×500 pixels), Post (1024×512 pixels).
- LinkedIn: Background image (1584×396 pixels), Profile picture (400×400 pixels), Post (1200×628 pixels).
Keep in mind that these specifications may change. It's always a good idea to check the latest guidelines for the platform you're using.
Online Tools to Reduce Photo Size
There are several online tools that make life much easier for those who need to reduce the size of a photo. You don't need to be an expert in image editing to use these platforms. They are designed to be intuitive, allowing anyone to adjust their images in just a few clicks.
Instant Compression to KB
If your goal is to reduce file size to fit into limited spaces, such as emails or online forms with megabyte restrictions, KB compression is the way to go. These tools take your image and, without you noticing a significant loss of visual quality, drastically reduce the file size. It's like magic, but it's just technology working in your favor.
Resizing by Percentage or Pixels
The most comprehensive tools offer flexibility. You can choose to resize your image in two main ways:
- Percentage: Great for getting a general idea of how much the image will shrink. For example, reducing it to 50% from the original size.
- Pixels: Ideal when you need an exact size, such as for a specific website banner or a profile picture with defined dimensions.
This variety ensures you can find the perfect fit for your needs, whether it's for a social media post or a website layout.
Customized Quality Options
Not all compression is created equal. Some tools allow you to choose your desired quality level. This means you can balance between a smaller file size and an image that still looks great. If you need a super lightweight file, you can opt for lower quality. If visual quality is more important, you can choose an option that retains more detail, even if the file size is slightly larger. It's a control that makes all the difference to the final result.
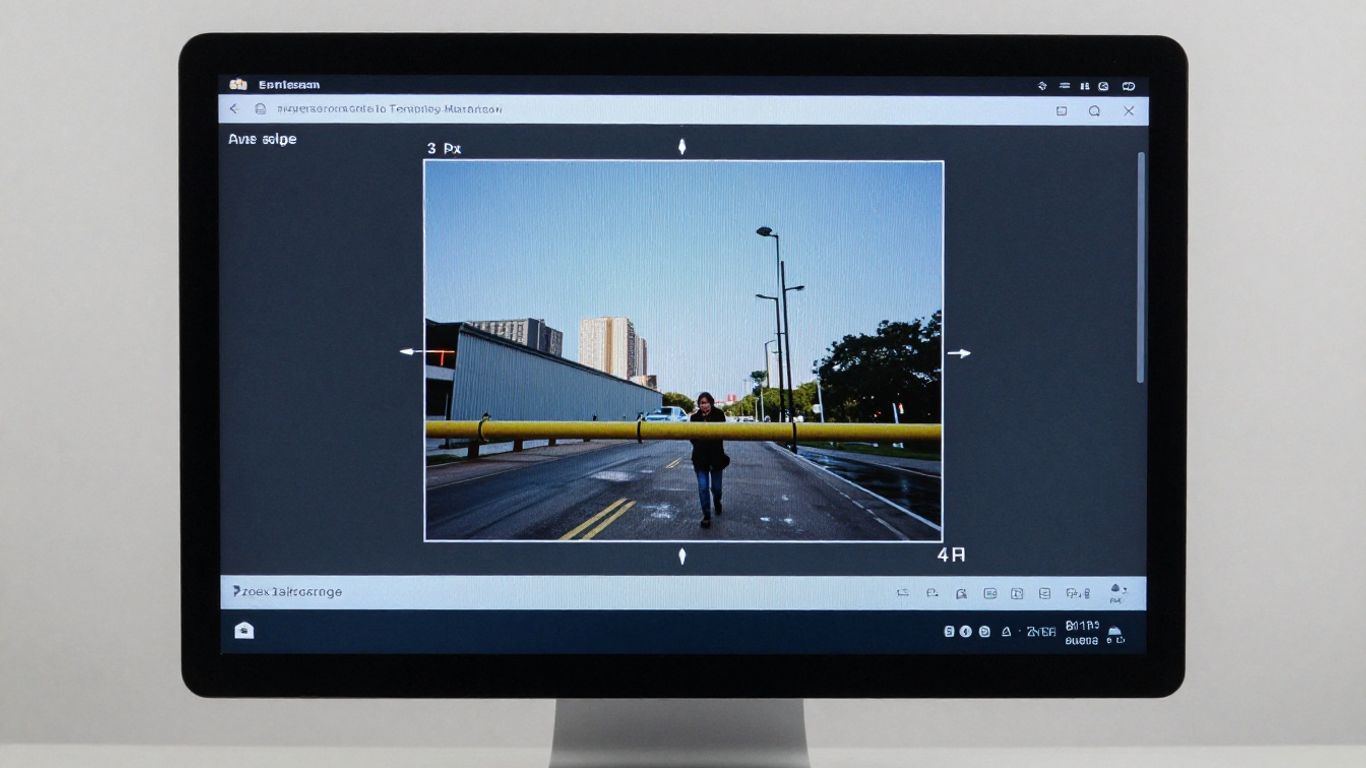
How to Resize Images Without Losing Quality
Sometimes we need to reduce the size of a photo, whether to put it on a website, send it by email, or even to better fit on social media. The problem is that, often, when trying to do this, the image becomes blurry, losing those details we liked. But look, it's possible to do this without ruining the photo.
Maintain Original Sharpness and Clarity
The secret is using the right tools. They can adjust the image dimensions, reducing the space it occupies on your computer or the internet, but without significantly altering the pixels that make up the image. Think of it like organizing a bookshelf: you can arrange the books to fit more, but without creasing the covers or tearing the pages. The goal is for the final photo to look virtually identical to the original, only smaller in file size.
Adjust Dimensions Without Compromising Details
There are several ways to do this. Some online tools allow you to choose a percentage to reduce the size, such as "I want the image to be 70% of its original size". Others let you define the exact dimensions in pixels, such as "I want it to be 800 pixels wide". The important thing is that the tool does a good job of recalculating the image information. If you choose a tool that uses lossy compression, then the quality may indeed drop. But good tools use methods that minimize this loss, focusing on removing information that the human eye doesn't even perceive.
Professional Results Made Easy
To ensure you don't lose quality, look for tools that offer adjustment options. quality. They usually come with a slider where you can choose how much
Free and Effective Image Resizer
Sometimes you just need to adjust the size of a photo, whether for a website, an email, or even for printing. And the best part is that you don't need complicated or expensive programs for this. There are online tools that do the job quickly and, most importantly, for free.
Adjust Sizes for Websites and Marketing
When you have a website or are creating marketing materials, image size matters a lot. Images that are too large slow down your website, which nobody likes, right? And for ads or posts, the right size ensures everything is clearly visible and professional. These online tools allow you to define the exact dimensions you need, whether in pixels or percentage. This way, your images are perfect for their purpose, without taking up unnecessary space or looking stretched.
An intuitive tool for all users.
Don't worry if you're not an expert in image editing. Most of these online tools are designed to be super easy to use. Usually, you just upload the photo, choose the new size, and you're done. Some even offer pre-defined options for social media or other common uses. It's as simple as choosing a file and clicking "save".
Clear Results in Just a Few Clicks
The great advantage of these free tools is that they can resize your images without the loss of quality that we all fear. You know when a photo becomes pixelated or blurry after resizing it? With the right options, this doesn't happen. You can maintain the original sharpness and details, even when adjusting the dimensions. It's like having a professional editor in your browser, but without the hassle and without the cost.
Compress Photos to Save Space
You know when you look at your phone or computer and the "storage full" message pops up? Well, large photos are the biggest culprits. Luckily, reducing the size of a photo online and for free is easier than it seems, and it helps a lot to free up space.
Reduce File Size Easily
Sometimes, we just want to save that special photo or send it to someone, but the file is huge. Online tools work their magic by compressing the image without losing the quality that matters. It's like shrinking the photo, making it lighter for your device or the internet. The secret is finding the right balance between file size and image sharpness.
Quick Optimization for Devices
Imagine having to wait forever to send a photo via message because it's too large? With compression, that doesn't happen. Smaller photos load faster, take up less space on your phone's memory, and can even make websites load faster, if needed. It's an optimization that makes a difference in everyday life.
Manage Your Digital Storage
Whether on your computer, in the cloud, or on your phone, space is always a scarce resource. Regularly compressing photos is a smart way to keep everything organized and still have room for new memories. Think of it like organizing your closet: you remove what you no longer use or what can be stored more compactly to make room for the new.
- Make a backup: Before you start compressing, always save a copy of your original photos. You never know when something might go wrong, right?
- Choose the right tool: There are several options online; look for one that is simple and delivers good results.
- Try different compression levels: Some tools allow you to choose how compressed the photo will be. See which one works best for you.
- Check the quality: After compressing, take a look at the photo to make sure the quality is still good for your use.
Image Adjustment for Printing and Digital Use
Prepare Photos for High-Quality Printing
When it comes to printing photos, whether for a family album or a professional project, quality is everything. It's no use having a beautiful image on your computer if it comes out pixelated on paper, right? To avoid this headache, it's important to adjust the image dimensions before sending it to the print shop or your home printer. Online tools greatly facilitate this process, allowing you to define the exact size you need while maintaining sharpness. Think about how the photo will be viewed: an image for a business card has different requirements than a photo for a store banner.
Adapt Images for Specific Applications
Each use requires a different size. A photo for an Instagram profile is not the same as an image for a website header or an advertisement. You need to think about the... space The image's size and how it will be displayed are all important factors. For example, creating passport photos requires a very specific size, and there are tools that can help with that. easily. Knowing the correct dimensions for each platform or purpose prevents awkward cropping or the image from becoming too stretched.
Compliance with Technical Specifications
Sometimes you need to follow well-defined rules. This happens a lot in graphic design work or when submitting images for publications. Technical specifications may include:
- Resolution (DPI): For printing, 300 DPI is generally sought for good quality.
- Dimensions in Pixels: The exact dimensions in width and height.
- File Format: JPG, PNG, TIFF, depending on the use.
- Color Space: Like CMYK for printing or RGB for screens.
Properly adjusting your images ensures they look exactly as you envisioned, whether on your monitor or printed on paper. It's a simple step that makes all the difference in the final result.
Hassle-Free Image Compression
Sometimes, we just want to reduce the size of a photo without having to go through a bunch of complicated steps, right? That's exactly what this part of the article aims to show. You don't need to be an editing expert to make your images lighter.
The process is very straightforward. You basically upload the file you want to work with, whether it's JPG or PNG, and the tool takes care of the rest. It's like magic, but it's just technology. You choose how much you want to compress it, and that's it. Downloading the optimized image is quick and uncomplicated.
Simple Upload of JPG and PNG Files
Forget about cumbersome programs that take a long time to install and open. Here, the key is practicality. You drag and drop your JPG or PNG files directly onto the page. If you need to do this with multiple photos at once, many tools allow batch uploading. This saves a lot of time, especially if you're organizing many photos for a project or your website.
Choose the Ideal Compression Level
This is the part where you have control. Generally, the tools offer some quality options, such as high, medium, or low. Or you can set a custom compression level, perhaps even specifying the final size in KB that you want. The secret is finding the balance: reducing the file size enough for your purpose without compromising its size. quality The visual aspect may be noticeably impaired. For the web, a little compression usually doesn't do any harm.
Quick Download of the Optimized Image
After choosing the compression level, simply click to download. The image comes ready, with its size reduced and ready to use. It's straightforward, there's no watermark (most of the time), and the whole process takes only a few seconds. It's the perfect solution for those who need to quickly optimize images without wasting time on complex settings.
Resize Images for Social Media
Each social media platform has its own rules regarding the ideal image size. If you want your photos to look perfect in your feed, profile, or anywhere else, it's important to adjust their size. This isn't just about aesthetics; it's also about ensuring the image displays correctly, without strange cropping or loss of detail.
Ideal Sizes for Facebook and Instagram
For Facebook, an image that is 1200 pixels wide by 630 pixels high usually works very well for posts. Instagram, which is more visually focused, has some variations. For the feed, 1080x1080 pixels (square) or 1080x1350 pixels (portrait) are good options. For Stories, the ideal size is 1080x1920 pixels, which is the full vertical format of the screen.
- Facebook (Posts): 1200×630 pixels
- Instagram (Square Feed): 1080×1080 pixels
- Instagram (Portrait Feed): 1080×1350 pixels
- Instagram (Stories): 1080×1920 pixels
Specific settings for Twitter and LinkedIn
On Twitter, profile cover images look great at 1500x500 pixels. For tweets, a size of 1024x512 pixels is a good reference. LinkedIn, which is a more professional network, recommends profile cover images of 1584x396 pixels. For posts on the LinkedIn feed, 1200x628 pixels is a recommended size.
Remember that these dimensions may change. It's always a good idea to check the platform's latest guidelines before posting.
Stay up-to-date with the guidelines.
Social media platforms are constantly changing. What works today may not be ideal tomorrow. Therefore, it's a good practice to periodically check the recommended image specifications. Online tools can help you make these adjustments quickly, allowing you to... resize your images For any platform, without complication. So your photos will always be ready to impress, no matter where you share them.
Conclusion: Smaller photos, no complications.
And there you have it! We've seen how simple it is to reduce the size of your photos online, and best of all, without spending a penny. Whether it's for your website, to send to a friend, or just to free up space on your phone, these online tools do the job quickly. You don't need to be a computer expert; just upload the photo, choose the desired size, and you're done. Now you know the easy way to get your images just right, without complications and without losing quality. Try it and see how easy it is!
Frequently Asked Questions
Do I need to pay to reduce the size of photos?
No, many online tools offer this service for free! You can reduce the size of your photos to fit anywhere without spending anything.
Can I reduce the size of the photo without compromising the quality?
Yes! There are tools that do this intelligently. They reduce the file size without making the image blurry or ugly. Everything stays sharp!
What types of photos can I reduce in size?
Generally, you can resize photos in the most common formats, such as JPG and PNG. These are the file types that most cameras and cell phones use.
How do I know the right size for each social network?
Each social network has an ideal size. For example, for Facebook and Instagram, a good size is 1200x630 pixels. Online tools usually have ready-made options for each of them.
Does reducing the size of a photo help save space?
Absolutely! Smaller photos take up less space on your phone, computer, or in the cloud. This allows you to store more photos and files.
Is it difficult to use these online tools?
Absolutely not! Most of them are super easy to use. You just need to upload the photo, choose the size or quality you want, and that's it. In seconds, your photo is ready.
Can I resize multiple photos at once?
Some tools allow you to upload multiple photos at once and regroup them. This saves a lot of time if you have many images to organize.
What does 'reduce to KB' mean?
This means reducing the file size of the photo so that it becomes very small, measured in kilobytes (KB). This is great when you need to send the photo by email or post it to places with size limits.
